Wondering what the difference between Stock and Broth is? I did too! I found my answer and thought if I didn’t know the difference, maybe someone else out there didn’t either! Thus this post was born.
Read on to discover the differences and similarities between broth and stock! 😉
Broth vs Stock
Similarities…
Both are used in similar ways. In soups, stews, sauces and the like.
Both can be made using either chicken, beef, or turkey ( as well as a few other animals).
Both are typically simmered with vegetables such as onions, celery, carrots, etc.
Differences…
Broth is made from meat. Stock is made from bones.
Broth has a thinner consistency compared to stock, while Stock is typically thicker.
Broth can be seasoned with salt and pepper, but Stock is left unseasoned.
There you have it! As I said, a brief answer to the question “what’s the difference between broth and stock”. Well, now you know!
Since we’re on the subject, check out how to make homemade chicken stock! It’s so easy and a great way to repurpose chicken bones!
Who else is excited for the first day of Summer in two days?!! 😎🌻😍☀️ Keep a lookout for a SUMMER GIVEAWAY we’re hosting in the not-to-distant future!
This Raspberry Oatmeal is deliciously creamy (thanks to a secret in cooking), and the fresh raspberries provide a welcome burst of berry flavor. Definitely a must-try breakfast!
Raspberries are in season and this Raspberry Oatmeal is a great way to use them! The berries add the perfect sweetness to this healthy, delicious breakfast.
The key to achieving the perfect creaminess is adding the oats to the saucepan right along with the water, rather than waiting for it to boil. The creamy aspect is so utterly delicious that you may have found your new favorite way to make oatmeal!
Can I use frozen raspberries?
I usually use fresh raspberries but frozen would work well too. The only main difference is that frozen berries will turn your oatmeal more red! 😁
Similar to our other oatmeal recipes, this raspberry oatmeal is ready in record time!
This Raspberry Oatmeal is deliciously creamy (thanks to a secret in cooking), and the fresh raspberries provide a welcome burst of berry flavor. Definitely a must-try breakfast!
In a medium saucepan, add the water, salt, and oats. Bring to a boil.
Stir in the maple syrup and raspberries.
Reduce heat and let oatmeal simmer for 4-5 minutes until cooked through, stirring occasionally. Serve.
Notes
You can use either fresh or frozen raspberries, just keep in mind that frozen berries may turn your oatmeal more red.
NUTRITION FACTS
Serves: 4 Amount per serving: 1/4 of recipe Calories 345 Total Fat 5.6g Saturated Fat 1g Sodium 197mg Total Carbohydrate 62g Dietary Fiber 10g Total Sugars 7.4g Protein 14g
*These Nutrition facts were estimated using a nutrition calculator and may not be exact
WEEKLY BIBLE VERSE
Fathers, do not exasperate your children; instead, bring them up in the training and instruction of the Lord.
~Ephesians 6:4
If you decide to make this Creamy Raspberry Oatmeal please don’t forget to LEAVE A REVIEW!! Drop a comment below with your review or any questions you have! 💗 I always love hearing from you.
Excited for Summer? Meee too!! I can’t wait for our garden to grow larger, for more popsicles and lemonade, and for the summer giveaway that the Inspired Whisk is hosting at the end of this month!
Welcome to the ninth edition of… What’s Been Cookin’
Recent Recipes I’ve made~
Someone gave us a bunch of rhubarb, and this strawberry rhubarb pie was the result! 🤤 Ah, it was deeelish.
🪴 Garden update: all the metal raised beds were assembled and filled. Now everything is planted and beginning to grow, which is soo exciting!! I’ll post a photo tour of the garden sometime soon. We’re growing lots of yummy things this year!
Recently I wrote a post showing how I planted our blueberry bushes in containers. Let me know if you enjoy posts like that so I know to publish more! 😉
In other news… we got pullets (a.k.a. young hens)!! 🤩 We have 7. I can’t wait for them to start laying eggs! 🐔
Some of the girls enjoying a generous slab of watermelon. 🍉
How is your month going? Is your garden planted? Do you raise any poultry? Let’s chat in the comments!
Thanks for reading!! I hope you have a wonderfully blessed weekend! 😍❤️
These Blueberry Pancakes are fluffy, soft, and perfectly scrumptious! With blueberries in every bite, these pancakes may easily become your go-to blueberry pancake recipe!
Nothing like a stack of golden brown, thick, fluffy pancakes for breakfast. Not to mention when they’re bursting with juicy berries in every bite! Yummm.
Frozen or fresh berries? Both will work! The difference is that frozen berries will most likely turn the batter blue. I used frozen blueberries when I took these photos, thus the blue color! I think it’s rather pretty though. 😍
These Blueberry Pancakes are fluffy, soft, and perfectly scrumptious! With blueberries in every bite, these pancakes may easily become your go-to blueberry pancake recipe!
3 tablespoons butter, melted, plus more for cooking
½ tsp vanilla extract
1 cup blueberries, frozen or fresh
Instructions
In a medium mixing bowl combine the flour, sugar, baking powder, baking soda, and salt.
In a separate bowl whisk together the egg, buttermilk, butter, and vanilla extract. Add to the dry ingredients and stir with a rubber spatula until the ingredients are just incorporated. Fold in blueberries.
Add ½ Tbsp butter to a cast iron skillet (or griddle) and heat over medium heat. Pour about 1/3 cup of the batter onto the skillet to make a pancake. Cook for about 1 to 2 minutes, or until the edges begin to bubble, then flip the pancake and cook for an additional 1 to 2 minutes. Transfer the pancake to a plate.
Repeat with the remaining batter. Serve pancakes warm with butter and syrup, if desired.
Notes
You can use either fresh or frozen blueberries, just keep in mind that frozen berries may give your batter a blue hint.
NUTRITION FACTS
WEEKLY BIBLE VERSE
The heavens declare the glory of God and the firmament shows the work of His hands.
~Pslam 19:1
If you decide to make these Blueberry Pancakes please don’t forget to LEAVE A REVIEW!! Drop a comment below with your review or any questions you have! 💗 I always love hearing from you.
I’m so excited as I write this. We recently moved (I’ll give a full garden tour in the coming weeks!) and we now have our garden beds filled and most of our plants planted… including our blueberry bushes! 🫐
Rather than planting our blueberry bushes straight into the ground, I decided to plant in containers. Why containers? I chose them for multiple reasons.
Blueberries need acidic soil, and planting in containers makes it much easier to maintain the required acidity.
Blueberry bushes are perennials, which means they produce every year. Planting in the ground would mean they are situated permanently, whereas you can easily move containers around if needed.
Planting blueberry bushes in containers also saves space.
Let’s go through the steps of planting!
Find a large pot
Your blueberry bushes will need quite a large pot, the minimum size being 18″ deep and 24″ wide. However, the size of the pot depends on what variety of blueberries you have. Some bushes may need a larger pot than others.
Use the right soil
Blueberries need very acidic soil (with a pH level of 4.5 -5.5) so regular soil by itself won’t do. I decided to go with equal parts of peat moss and well-draining soil. (The ‘garden blend’ soil also had some compost mixed in)
Planting
Once you’ve filled your pot with soil, it’s time to plant your blueberry bush. You’ll want to plant it as deep as it was in its original nursery pot. An easy way to tell how deep to plant it is to make a large hole in the soil, then place the blueberry bush (still in its pot) into the hole to see if it’s the right size. Voila! If it is, then go ahead and plant it.
Mulching
Mulch the blueberry bush with 2 inches of straw, pine bark, or pine needles.
Water
Keep your blueberry bush well-watered! The key here is to keep them consistently moist but not soggy.
Light
Last on the list to discuss, we have light! Blueberry bushes will need a good 6 to 8 hours of direct sunlight a day.
There you have it, folks! How to plant a blueberry bush in a container. Simple, right?!
Take good care of your bushes and they’ll repay you will delicious, plump blueberries. Keep in mind that blueberry bushes won’t produce a lot of fruit in their first couple of years. But after that, they’ll produce many berries year after year- it’s worth the wait!
Since we’re on the subject of blueberries, here are some wonderful blueberry recipes to bring this post to a close. 🫐
An easy-to-make, creamy dip perfect for sliced apples or graham crackers!! Just the thing for a five-minute snack.
Prep Time: 5 mins Total Time: 5 minutes
Author: the Inspired Whisk
Yields: approx. 1 1/3 cups dip
Ingredients
1 cup plain whole milk yogurt
1/3 cup peanut butter
1 Tablespoon honey or maple syrup
dash of vanilla
Instructions
Mix all ingredients in a bowl until smooth.
Serving suggestions: sliced apples, graham crackers, strawberries, bananas, etc.,.
Notes
This dip will sometimes be thicker or thinner, depending on the yogurt you use.
If you prefer the dip sweeter, simply add an extra Tablespoon of honey (or maple syrup).
Yields: approx. 1 1/3 cups dip
WEEKLY BIBLE VERSE
The secret of the Lord is with them that fear him; and he will shew them his covenant. Mine eyes are ever toward the Lord; for he shall pluck my feet out of the net.
~Psalm 25:14-15
If you make this Peanut Butter Dip, please don’t forget to LEAVE A REVIEW!! Drop a comment below with your review or any questions you have! 💗 I love hearing from you.
Learn how to make your own chicken stock with this easy-to-follow guide. Make it once and you won’t find yourself tossing good chicken bones again! This chicken stock is hearty, nutritious, and full of flavor.
This homemade chicken stock is so easy to make! Also a great way to use the carcass of your rotisserie chicken rather than tossing it.
Just a few minutes of your time and some beautifully flavored chicken stock is well on its way!
Use this in your favorite soups, stews, and sauces! (It’s especially delicious in homemade chicken soup.)
Add Bones and VeggiesAdd WaterCook
What fresh herbs do I add?
Parsley, thyme, oregano, or rosemary are good options!
Homemade Chicken Stock
Learn how to make your own chicken stock with this easy-to-follow guide. Make it once and you won’t find yourself tossing good chicken bones again! This chicken stock is hearty, nutritious, and full of flavor.
Prep Time: 5 mins Cook Time: 8 hours Total Time: 8 hours 20 minutes
Author: The Inspired Whisk
Ingredients
1 whole chicken carcass (picked mostly clean)
2 medium carrots, chopped*
2 celery stalks, chopped
1 large yellow onion, skin on and quartered
1 Tablespoon whole peppercorns
Fresh herbs (dried herbs will work, too) **
8 cups water
Instructions
Add all ingredients to a slow cooker.
Turn on “low” and cook for at least 8 hours or longer (up to 24 hours if desired. *see note)
Once done cooking, strain your chicken stock through a fine mesh sieve to ensure all little bones are removed.
Let cool. (If a layer of fat rises to the surface, scoop it off and discard.)
Divide stock into jars or storage containers. Store in the refrigerator for up to a week or in the freezer for up to 3 months.
Notes
You can use 1 cup of baby carrots instead of 2 medium carrots if that’s what you have.
Use any fresh herbs you have! Just look in your refrigerator or in your garden and snatch up a bit. You can even use ½ Tablespoon of dried thyme and a bay leaf if you’d like. You can’t really go wrong with what herbs you choose!
The longer you cook the stock the more nutrients will seep out of the chicken bones. You can cook it for up to 24 hours if you’d like! Sometimes I’ll throw everything in the crockpot at night and it’ll be done in the morning.
WEEKLY BIBLE VERSE
But ye are a chosen generation, a royal priesthood, a holy nation, a peculiar people; that ye should shew forth the praises of him who hath called you out of darkness into his marvelous light; ~1 Peter 2:9
If you make this Homemade Chicken Stock, please remember to LEAVE A REVIEW!! Drop a comment below with your review or with any questions you have! 💗 I love hearing from you.
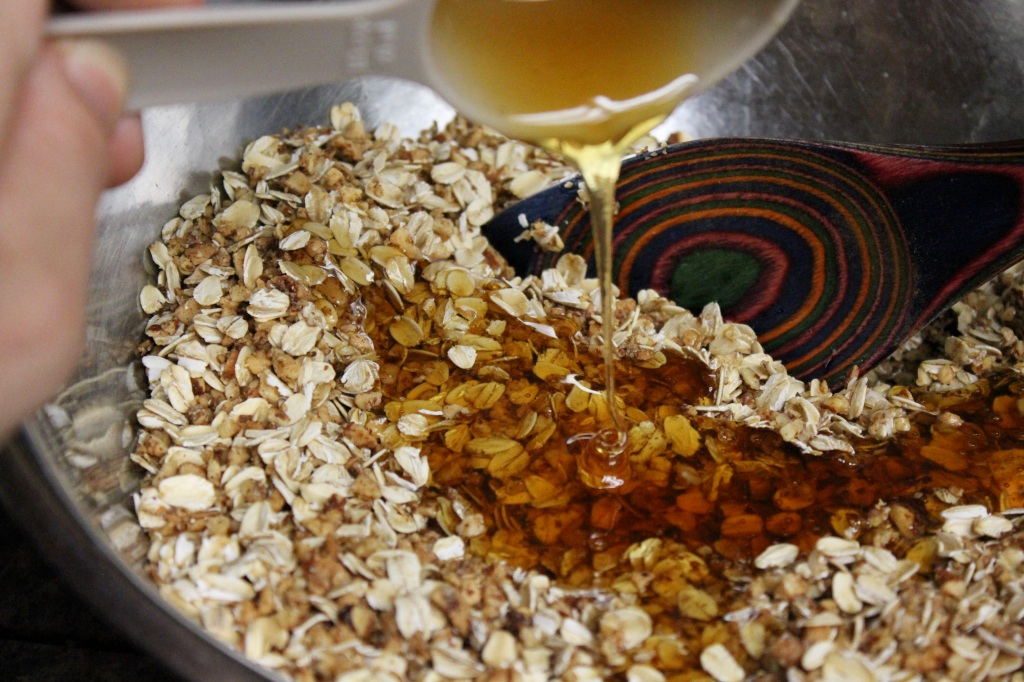
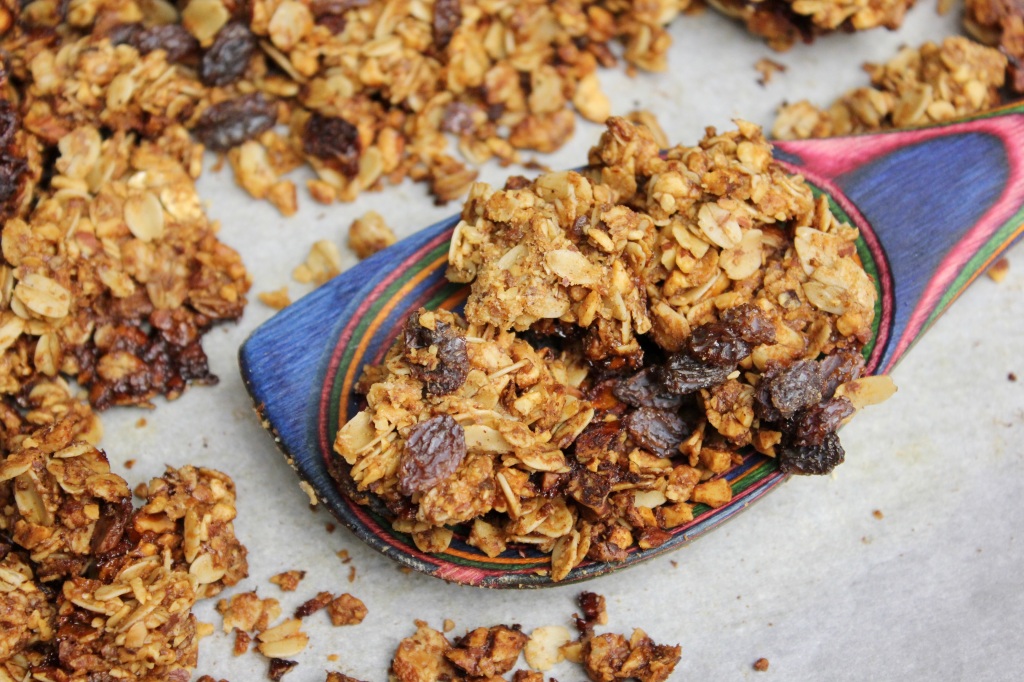
The amazing clusters of this Raisin Cinnamon Granola are irresistibly delicious! And it’s surprisingly simple to make. So much better than store-bought!
You can serve it with milk or yogurt for a quick, healthy breakfast. Add some fresh berries and a splash of maple syrup and boom; you’ve created something out of this world delish!
Yum! I’ll never be buying granola from the store again. 😉
Honey or Maple Syrup?
I’ve used both and can say that your granola will be perfectly sweet and crunchy either way! However, if you use maple syrup, it will crumble easier than if you use honey. Not to worry, you will still get some nice clusters!
Raisin Cinnamon Granola
This is a must-make granola recipe! The raisins and cinnamon make this granola toasty and sweet. Just the thing for a healthy breakfast!
Preheat oven to 300°F. Line an 11” x 17” baking sheet with parchment paper and set aside.
Combine the oats, nuts, and cinnamon in a large bowl.
Drizzle the coconut oil, honey, and vanilla over the dry ingredients. Stir very well until all the dry ingredients are completely coated. Pour onto your parchment-lined baking sheet and spread evenly into a 1-inch thick layer.
Bake for 25-28 minutes, until granola turns golden brown.
Remove from the oven, sprinkle the raisins on top, and let the granola cool completely on the counter. (It will achieve that perfect crunchy crispness as it cools!)
Break the granola into pieces and enjoy! Store in an airtight container for up to two weeks.
Notes
I typically use almonds, but pecans or walnuts will work great, too. You can chop the nuts or I like to pulse them several times in the food processor to get them into much smaller pieces.
Maple syrup will work in place of the honey if necessary.
Enjoy this granola either by the handful or withmilk or yogurt! It’s delicious with fresh berries as well!
Yields: approx. 7 cups of granola
WEEKLY BIBLE VERSE
Come now, and let us reason together, saith the Lord: though your sins be as scarlet, they shall be as white as snow; though they be red like crimson, they shall be as wool.
~Isaiah 1:18
If you make this Raisin Cinnamon Granola, please don’t forget to LEAVE A REVIEW!! Drop a comment below with your review or any questions you have! 💗 I love hearing from you.
We’ve been making these buttermilk biscuits for as long as I can remember. They’re so soft and flaky that it’s a sure thing they’ll become your favorite!
These biscuits are perfect for smothering with butter and jam, gravy for a quick breakfast, or even making a breakfast sandwich!
½ cup (1 stick) butter, slightly softened and cubed
3/4 cup buttermilk
Instructions
Preheat oven to 425ºF
Mix the flour, baking powder, baking soda, and salt in a mixing bowl. Cut in the butter using two butter knives (or your hands) until the mixture resembles coarse crumbs. Add buttermilk and stir just until it turns into a soft dough.
Turn dough onto a lightly floured surface and knead for 30 seconds. Roll or pat in a circle until approximately 1 inch thick. Use a 2-inch biscuit cutter (or the rim of a jar) to cut into about 14 biscuits, re-rolling and cutting dough as necessary.
Transfer the biscuits to an ungreased baking sheet, placing them 2 inches apart. Bake for 12 minutes, until tops are golden brown.
Yields: approx. 14 biscuits Amount per serving: 2 biscuits Calories 265 Total Fat 14g Saturated Fat 8.9g Sodium 557mg Total Carbohydrate 30g Dietary Fiber 1g Total Sugars 1.4g Protein 4.7g
*These Nutrition facts were estimated using a nutrition calculator and may not be exact
WEEKLY BIBLE VERSE
When I was afraid, I trusted in thee.
~Pslam 56:3
If you decide to make these Buttermilk Biscuits please don’t forget to LEAVE A REVIEW!! Drop a comment below with your review or any questions you have! 💗 I always love hearing from you.


You must be logged in to post a comment.